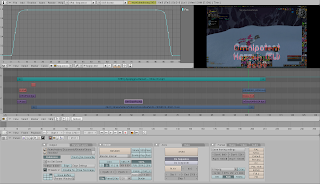
 As promised, here's the first insight in video editing with Blender 2.48a under Ubuntu.
First of all Blender is a bit different. You will notice that if you try to play around with it, as with normal programs it will get you nowhere, but totally mess up your views and eventually get you so lost, you will have little other then to restart Blender and hope for the best :) For example, a good thing to know in Blender is that a right click on mouse will do most likely what you would expect a left click to do, although not necessarily :) So before you give up on it, I strongly recommend viewing at least some basic video tutorials on how-to use Blender or search YouTube and Google for some tutorials, it really pays off.
OK that sorted out, you have some basic knowledge how Blender works, you pop it up, and first thing you do (actually almost everytime you start it up fresh) mouse over the default cube, press X and delete it (this is basic Blender usage I was telling you about :) -all about shortcuts...) Next thing you'll want to do is switch to "video editing mode" in other words called "Sequence" layout in Blender (choose it from top menu bar, default is 2-Model, you'll want it to be 4-Sequence). It will show up a screen much like the one above, only without any data. Now, pay attention as Blender is sensitive to where your mouse is (like when you hover over another window in Blender, the shortcuts you press on keyboard will work in that window and not the last one you clicked something in) and press SPACEBAR when hovering over the middle window or just press menu option ADD to add a movie + audio or either one, or even an image (or sequence of images). After resizing the window so it will look something like you could use, its time to add effects and stuff to your video.
Basiclly I will just explain what I did in the screenshot above, and show you what came out later. My main video is dark blue bar on the bottom (all the "bars" are in the middle window), my audio stream is an MP3 file, light blue on top. Purlple bottom left is my black-background image, the one above it is the "Teihoo 2009" logo image displayed in the first 5 sec of the movie or so. The redish colored bars above the images are my effects. Simple "cross" effect, showing it will cross "from track 2 into track 3" - meaning from black background to "Teihoo 2009" logo smoothly. Then the logo fadeout to main movie in the upper redish bar (its small and doesn't show any titles in the pic but it should say 3 > 1). Next interesting area is in the "middle" area, we have another image - this one shows the text "Sapira" with a little arrow to the right (in the final video output) - now if you look back at the screenshot of my Blender scene the upper left window shows the "opacity timeline" that I set for the selected object (in my case middle image - "Sapira with an arrow") - this will smoothly bring the overlay image into the scene and also softly remove it at the end of it - you can add the the curves by selecting an object and CTRL-Left clicking in the curve window.
Now the right part (end of the movie) should be pretty obvious: I have fade out scene to black-background image and I bring in the finishing titles. And what you can't see on the image, is that I also fade out audio stream, so it doesn't just cut off in the end, but fades out... It's done the same way as with "Sapira and the arrow" thingy.
Pretty easy, right? :) Well it gets better! How about adding some titles :) As you can see in my movie there's some (nice?) 3D titles in the end. Well that was done with Blender and a bit of playing with it :) but its really simple to add 2D titles and even make them 3D with just a little bit of tweaking and with a .blend file from this site.
One more thing about the images and titles you want to put in. One way is to use ADD instead of REPLACE, but this will work good only on 2D titles... on 3D objects modeled in Blender, you can use a SCENE and ALPA OVER to put it in your video. Or if you want it really simple, then render one image of your video, open it in Gimp and draw what you like to new layer. Then save that new layer only as PNG and use transparent background (remove the backgorund you used from video clip, since you only needed it to position your drawing correctly) - then you can ALPHA OVER the transparent PNG just as you would the SCENE ... go figure :P
When you're done, you can choose a variety of output formats that preset like a DVD and SVCD or custom Xvid, H264 or some other format.
And the result? Well here it is :) Bear in mind, that I did this in just few days after I discovered Bledner and I have still much to learn about it!
Click here for high-res
This comment has been removed by the author.
ReplyDelete