Tuesday, May 12, 2009

So little time and so many new things...

Hello everyone,

I'm really sorry for not being able to post more here, specially now that I finally upgraded Ubuntu to 9.04 (from 8.04) - I'm still not perfectly happy with it as I was also affected with performance regression due to changes in Xorg 1.5 and 1.6, and on the other hand the new PulseAudio is really awesome and there lots of things that work a lot better under 9.04. Well actually only my WoW plays with about 20% less performance ...

Just a short note for those of you strugleing with new Ubuntu release and some Wine performance:
  • make sure you setup PulseAudio and set it also in WoW (dont use Hardware Audio checkbox)
  • I had some profile issues, so I created new user and then migrated Apps to that user - but my profile was really old and full of junk - there's also Janitor Option now - so you should check that out
  • I'm using Nvidia 173 driver and not the 180 (173 still gives me better performance)
  • If you have any compiz/desktop issues after upgrade, I would strongly suggest clearing up the profile (that's the "/home/username" folder) - creating a new profiles seems the easiest transition, but dont do it, if it's not really necessery
The rest was pretty much a great upgrade (from 8.04 to 8.10 then 9.04) the whole process took me about a day with all the tweaking and cleaning up... but I do install a lot of apps and try out a lot of other stuff, so it should be much faster then what I did. I'm glad to say that the majority of applications are working just as good as before or better and I haven't found a thing that wouldn't yet!

Good luck with upgrades!

Wednesday, January 28, 2009

Windows 7 to the ATI rescue?


Recently, Microsoft released a BETA version of its new client operating system to the public. I couldn't resist the urge to install it and give it a try.

For this I used my work notebook, an HP nc6400 with ATI x1300 Mobility Radeon, which performs crappy under Windows XP aswell as Ubuntu 8.10. There's a lot of issues with ATI graphics under all of the operating system really, so I prefer to use Nvidia wherever I can.

First things first - I did a complete format of the notebook and split the disk in 2 major partitions - one for Ubuntu and one for Windows 7 (which can be downloaded here). Actually Windows now makes about 200MB partition for some system files, and the rest as C:, while Ubuntu creates a root system (/) and one for your swap file.

Both install smoothly its very simple to get them working, I still love the Ubuntu way of adding applications and the usability of Compiz desktop... but indeed Windows improved! Unlike Vista it now loads decently fast, and runs quite smoothly with a normal memory usage and much better disk access (faster reads/writes). It has bugs, since it's beta - for example, I cant safely remove my portable disks and some other "not-so" important issues that are not resolved yet. All in all it looks much better specially due to the new taskbar, which kinda acts like a dock now... but still needs polishing.

Last thing I wanted to mention, for people interested in testing Windows 7 is specially with ATI graphics, since I have many problems with it with XP or Ubuntu, Windows 7 works really nice with ATI graphics. I play World of Warcraft a lot and actually at the place where my frame rate was the worst (Dalaran) actually doubled with Windows 7!

Monday, January 12, 2009

HandBrake 0.9.3 with Ubuntu Hardy 8.04

At http://handbrake.fr you can download latest version of HandBrake 0.9.3 (the popular DVD to MPEG-4 converter).

"HandBrake is no longer limited to DVDs: it will now accept practically any type of video as a source. This massive enhancement was achieved by tapping into the power of libavcodec and libavformat from the FFmpeg project." --from handbrake.fr

But the installer for Ubuntu only comes for the Intrepid Ibex 8.10. And since I'm still using Hardy, here's how I got my hands on the latest HandBrake:

  1. Get the launchpad repository address from here. On the Launchpad site you'll want to select Hardy Heron builds (from drop down menu) and the repository line looks like this:
    deb http://ppa.launchpad.net/handbrake-ubuntu/ubuntu hardy main
  2. Navigate to System -> Administration -> Software Sources and under Third-Party Software tab click +ADD button and add the above line. Close Software Sources and Reload the repositories at prompt.
  3. Now open System -> Administration -> Synaptic Package Manager and search for "handbrake".
  4. Install all three packages and start Handbrake via Applications -> Sound & Video -> HandBrake.
If you're having problems with some video formats then reinstall FFmpeg from Medibuntu repositories (open terminal copy/paste these lines one after another):
  • sudo apt-get remove ffmpeg
  • sudo apt-get update && sudo apt-get install medibuntu-keyring && sudo apt-get update
  • sudo apt-get install ffmpeg
I also installed all of the GStreamer plugins in Ubuntu, so everything plays OK (not for encoding), but I don't think you need it.

Hope it works!

Sunday, January 4, 2009

Simple video editing with Blender

As promised, here's the first insight in video editing with Blender 2.48a under Ubuntu.

First of all Blender is a bit different. You will notice that if you try to play around with it, as with normal programs it will get you nowhere, but totally mess up your views and eventually get you so lost, you will have little other then to restart Blender and hope for the best :) For example, a good thing to know in Blender is that a right click on mouse will do most likely what you would expect a left click to do, although not necessarily :) So before you give up on it, I strongly recommend viewing at least some basic video tutorials on how-to use Blender or search YouTube and Google for some tutorials, it really pays off.

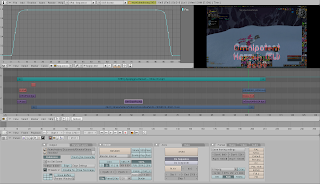
OK that sorted out, you have some basic knowledge how Blender works, you pop it up, and first thing you do (actually almost everytime you start it up fresh) mouse over the default cube, press X and delete it (this is basic Blender usage I was telling you about :) -all about shortcuts...) Next thing you'll want to do is switch to "video editing mode" in other words called "Sequence" layout in Blender (choose it from top menu bar, default is 2-Model, you'll want it to be 4-Sequence). It will show up a screen much like the one above, only without any data. Now, pay attention as Blender is sensitive to where your mouse is (like when you hover over another window in Blender, the shortcuts you press on keyboard will work in that window and not the last one you clicked something in) and press SPACEBAR when hovering over the middle window or just press menu option ADD to add a movie + audio or either one, or even an image (or sequence of images). After resizing the window so it will look something like you could use, its time to add effects and stuff to your video.

Basiclly I will just explain what I did in the screenshot above, and show you what came out later. My main video is dark blue bar on the bottom (all the "bars" are in the middle window), my audio stream is an MP3 file, light blue on top. Purlple bottom left is my black-background image, the one above it is the "Teihoo 2009" logo image displayed in the first 5 sec of the movie or so. The redish colored bars above the images are my effects. Simple "cross" effect, showing it will cross "from track 2 into track 3" - meaning from black background to "Teihoo 2009" logo smoothly. Then the logo fadeout to main movie in the upper redish bar (its small and doesn't show any titles in the pic but it should say 3 > 1). Next interesting area is in the "middle" area, we have another image - this one shows the text "Sapira" with a little arrow to the right (in the final video output) - now if you look back at the screenshot of my Blender scene the upper left window shows the "opacity timeline" that I set for the selected object (in my case middle image - "Sapira with an arrow") - this will smoothly bring the overlay image into the scene and also softly remove it at the end of it - you can add the the curves by selecting an object and CTRL-Left clicking in the curve window.

Now the right part (end of the movie) should be pretty obvious: I have fade out scene to black-background image and I bring in the finishing titles. And what you can't see on the image, is that I also fade out audio stream, so it doesn't just cut off in the end, but fades out... It's done the same way as with "Sapira and the arrow" thingy.

Pretty easy, right? :) Well it gets better! How about adding some titles :) As you can see in my movie there's some (nice?) 3D titles in the end. Well that was done with Blender and a bit of playing with it :) but its really simple to add 2D titles and even make them 3D with just a little bit of tweaking and with a .blend file from this site.

One more thing about the images and titles you want to put in. One way is to use ADD instead of REPLACE, but this will work good only on 2D titles... on 3D objects modeled in Blender, you can use a SCENE and ALPA OVER to put it in your video. Or if you want it really simple, then render one image of your video, open it in Gimp and draw what you like to new layer. Then save that new layer only as PNG and use transparent background (remove the backgorund you used from video clip, since you only needed it to position your drawing correctly) - then you can ALPHA OVER the transparent PNG just as you would the SCENE ... go figure :P

When you're done, you can choose a variety of output formats that preset like a DVD and SVCD or custom Xvid, H264 or some other format.

And the result? Well here it is :) Bear in mind, that I did this in just few days after I discovered Bledner and I have still much to learn about it!

Click here for high-res


Thursday, January 1, 2009

From Windows to Linux (Ubuntu)


Here's a list of some applications I wanted to use (and what I found/use now):
  • Total Commander with WinRar (works with Wine, and I use Gnome Commander for some similar functionallity. Also Krusader is your other option)
  • World of Warcraft (works with Wine, and I use alsa-oss sound wrapper, works better)
  • EVE On-line (has self installer under Linux, also works with Wine - or it used to)
  • Ventrilo / TeamSpeak (works with Wine + some manual codec copying / native client)
  • Fraps (glc-capture is a lot like fraps, there's also recordmydesktop and Istanbul desktop recorder)
  • Firefox / Thunderbird / OpenOffice.org (all come with Ubuntu, personally I used OOo on Windows, so I have no need for Microsoft Office, but some version can be installed with Wine)
  • VirtualDub / some sort of Movie Maker or Pinnacle Studio (Avidemux is ok, but not as strong as VirtualDub, I also use FuocoTools (link2) for conversion frontend / tried Cinerrela and LIVEs for video editing, but mostly they don't work for me and currently I can't find a good one that would. Recently I started using Blender for 3D modeling and animation and has a built-in video editor, but I haven't checked it out yet - so expect a post on this later)
  • VMware / VirtualBox (both work fine)
  • Nero / Roxio (GnomeBaker, K3B, Brasero - all installable through APT)
  • MSN / GoogleTalk / Yahoo / ICQ / ... (Pidgin works great but there are others too)
  • Media Player Classic + codecs / Winamp (VLC + Gstreamer codecs from repositores / XMMS - repo here, deb file here)
  • Photoshop / Paint Shop Pro (Gimp, GimPhoto - I also tried running Photoshop CS2 with Wine successfully after copying files from Windows installation and applying registry keys, but I don't use it so...)
  • Some Google applications have installers for Linux (GoogleEarth, Picasa)
  • Some other applications like local dictionaries, HTML editors (Homesite+, Notepad++) work for me with Wine, but now I mostly look for OpenSource software and try to use that instead. Also commercial applications offer more and more Linux versions.
Apart from that, I wanted TV out with full screen video and I use 2 sound cards, 1 for desktop and 1 for TV set, so that should work aswell. And it does, both ATI and Nvidia have much like in Windows configuration tool to do just that. Sound adapters were configured as its described in the old PDF posted previously.


The beginings of my Ubuntu expirience...